Dogeparty
How to Use Dogeparty: A Complete Guide

In this guide we explain everything you need to know to use Dogeparty, the standard asset & NFT creation protocol for Dogecoin.
A downloadable version of this guide can be found here.
Table of Contents
II. How Does It Work?
a. XDP
b. Dogewallet
III. How Do I Get Started?
a. Dogewallet Installation Steps
b. Wallet Creation Steps
IV. How Do I Send/Receive an Asset?
V. How Do I Create an Asset?
a. Numeric Tokens
b. Attaching an Image
c. Named Tokens
d. Issue/Lock Supply
VI. What is a Dispenser?
a. Buying from a Dispenser
b. Buying XDP from a Dispenser
c. Selling from a Dispenser
VII. What is the Exchange?
a. Finding a Trading Pair
b. Filling an Order
c. Creating a New Order
d. Creating a New Trading Pair
e. DOGE Trading Pairs
VIII. What are Some of the Other Things I Can Do With Assets?
a. Change Description
b. Destroy Supply
c. Transfer Ownership
d. Pay Dividends
e. Create Subassets
IX. How Do I Import the Private Key of an External DOGE Address?
X. How Do I Use dogeparty.xchain.io?
a. Asset Information Pages
I. What is Dogeparty?
Dogeparty is a protocol that provides additional functionality for Dogecoin by using a special set of rules to allow the creation of tokens on its blockchain. To do this, it uses software forked from Counterparty, which is the same concept, but built for the Bitcoin blockchain. The most famous examples of Counterparty tokens are known as Rare Pepes, which are (more-or-less) “digital trading cards” based on variations of the Pepe the Frog meme.
Initially launched in August 2014 (years before the term “NFT” came into existence), Dogeparty was revamped in September 2021 for the primary purpose of introducing Rare Doges, which is the Doge meme equivalent of Rare Pepes. The main difference is Rare Doges are stored and transacted on the Dogecoin blockchain instead of the Bitcoin blockchain. Thousands of tokens have been created using Dogeparty; first between 2014-16 and then again in 2021-22.
In effect, Dogeparty serves not just as a way for artists to showcase their talent but also for creative-minded developers who want to push the bounds of this tokenization technology, expanding its potential use cases in the process. Given the implications of the importance of the blockchain timestamp – in terms of self-managed data/financial ownership – Dogeparty token uses are limited only by one’s imagination.
Note: The terms asset and token are used interchangeably in this guide as they both refer to the same thing. They are also used interchangeably in the Dogewallet and by the Dogeparty community.
II. How Does It Work?
Dogeparty works by sending and reading extra data in the Dogecoin blockchain that represents token-related transactions. This data is encrypted by the protocol and placed in ordinary Dogecoin transactions. It cannot be read by standard blockchain explorers but is interpreted through the Dogeparty protocol. This means that, like regular Dogecoin transactions, Dogeparty transactions cannot be forged, removed, or reversed. This makes Dogeparty an ultra-secure method for creating, storing, and transacting Dogecoin-based crypto assets or NFTs.
For technical details of how Dogeparty works and its specifications, please read the official documentation for Counterparty, the protocol from which Dogeparty was directly ported.
XDP
To create assets such as NFTs in Dogeparty, all that is required is a few DOGE. XDP is the Dogeparty utility token that is used to create a kind of asset known as Named Tokens (0.5 XDP per token). It is also used to make dividend payments (varies in cost). 85% of all XDP were creating using the Proof of Burn consensus mechanism in 2014 which effectively “burned” over 1.85 billion DOGE by moving them to an inaccessible wallet. Those who engaged in this initial coin burning process were rewarded with an amount of XDP proportional to the quantity of Dogecoin burned.
The process for making new XDP was reopened in 2021, this time called “The Bern,” in which funds were collected in a developer-controlled wallet, to be used for future platform development and server payments to keep the Dogeparty protocol in operation.
Dogewallet
The main implementation of the Dogeparty protocol is the Dogewallet, which is a desktop Dogecoin wallet built especially for Dogeparty tokens (usually referred to as “assets” within the wallet). It is based on Freewallet, a time-tested Bitcoin wallet that is used for Counterparty assets and transactions. Dogewallet can be used to hold or transact DOGE, XDP and tokens created using the Dogeparty protocol.
The Dogewallet also doubles as a highly-flexible token creation and management system. Furthermore, it features its own DEX, or decentralized exchange, which can be used to create markets and place orders for any pair of supported tokens. This makes it a highly powerful utility and a must-have for any Dogeparty user.
III. How Do I Get Started?
The first thing you’ll need to get started Dogepartying is the Dogewallet, which can be downloaded here. It is available for Windows, Mac OSX, and Linux devices. There is also a web version of Dogewallet that can be accessed here, but we recommend downloading the Dogewallet client and installing it on your computer as this is a more secure practice.
Click here for a short video on how to download the Dogewallet.
Click here for a short video on how to create a web wallet.
Dogewallet Installation Steps
For the purposes of this guide, we will be installing the Windows version of Dogewallet.
1. First visit dogeparty.net/wallets, and click the link that says “Download for Windows”. A new window will open where you will be brought to the Dogewallet releases page on GitHub. Most PCs running Windows made in the last five years will support the Win64 version, so we recommend downloading that version. Under the Assets section of the page, click on “DogeWallet.win64.exe” to get started downloading. We recommend downloading the latest release (version) of this wallet.
2. After the download has completed, click on the file to begin installing it. Your computer may warn you about installing the wallet or prevent you from installing it altogether, displaying a message that looks like this:
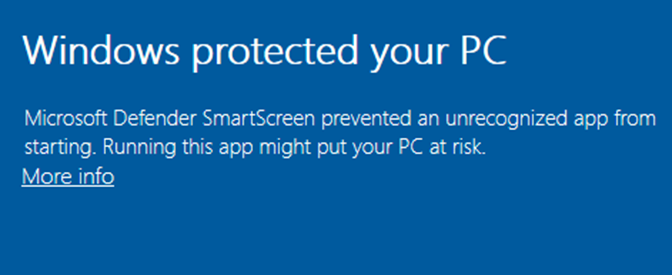
This is a standard message for new programs that have not yet specifically been registered with Windows. If you have concerns, feel free to view the VirusTotal results for the wallet (or run your own virus scan), which will confirm the file is not “malicious.”
3. To continue installation, simply click the “More info” link in the message. This will reveal an additional option in the bottom corner of the screen that says “Run anyway”. Click it to proceed. Then click “Yes” in the next popup window and then “Next” to install the wallet in its default location on your computer (C:\Program Files\DogeWallet). Click “Next” again, and then “Install”. The Dogewallet will now be installed on your computer. After it has completed, click “Finish”.
Note: Keep in mind that the Dogewallet is a work in progress. It does suffer from some known bugs which may or may not interfere with your Dogeparty experience. If you have pressing concerns, please let the developers know in the Official Dogeparty Chat group on Telegram.
Wallet Creation Steps
1. After installation, a shortcut titled “DogeWallet” will be placed on your desktop. Click on it to get started creating your wallet. You may be greeted with a Donate window from time-to-time, including the first time you open the wallet. You can make a DOGE donation to developers later, but for now close the Donate window by clicking the “x” in the top right of its screen. The Dogewallet opening screen looks like this:
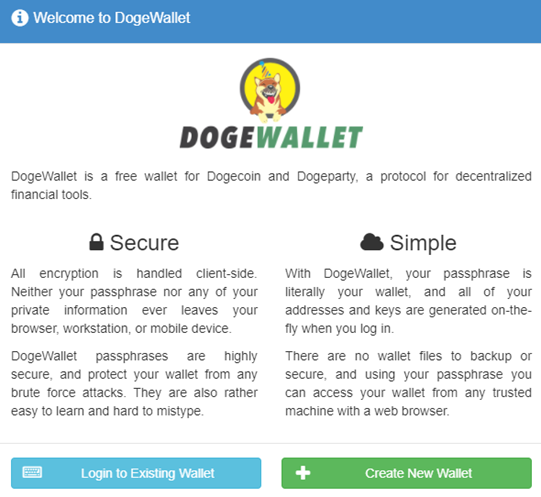
Click “Create New Wallet” to get started.
2. You will now be presented with your wallet passphrase which is needed to log back into the wallet each time you log out. It is a sequence of 12 words generated in random order and is very similar to a seed phrase generated in other popular crypto wallets, like MetaMask, Electrum, or Exodus.

Your passphrase is the single most important piece of information you will need to access your coins and tokens, so heed the warnings stated below it! You will want to keep your passphrase in a safe and secure location that only you can access.
A good idea would be keeping your passphrase in a password-protected Word document or Excel file that is stored only on your computer and a thumb drive for backup. Writing it down on a piece of paper and keeping it hidden (like in a safe or lockbox) is an even better idea. Keeping it in an easily-accessible location or uploading it to cloud storage are both bad ideas.
Think of your passphrase as a username, password, and security PIN all-in-one. If somebody else retrieves it, they can drain all the funds stored in your wallet. If you lose it, you will not be able to recover your funds.
3. After you have saved your passphrase somewhere secure, check the box that says “I have written down or otherwise securely stored my passphrase” and click “OK” to continue.
4. You will now be brought to the main wallet screen, which looks like this:

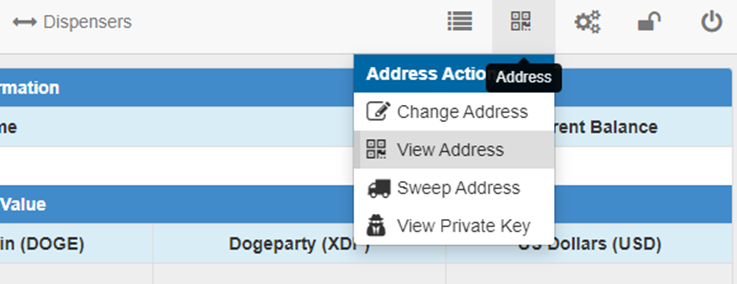
Your assets will appear in the left column, under your DOGE balance (which is currently zero). The first thing you’ll want to do is locate your primary Dogewallet address. This is the Dogecoin address to which you will send DOGE to fund your wallet. To find your address, click on the QR code icon, which is the 4th icon from the top right and select “View Address”.
This will open a window that displays your primary Dogecoin address in your Dogewallet. The address is displayed in both QR code and plain text form.
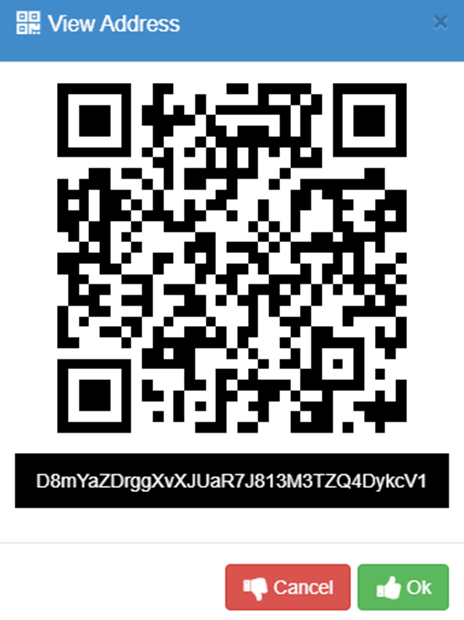
You can use this address to receive DOGE or Dogeparty assets. You wallet also contains additional addresses (starts with 10 by default) and you can generate an infinite number of new addresses, as well. And that’s it! Your wallet has now been created, and you are ready to fund it with DOGE (and/or assets).
Click here for a video on how to view and change between addresses in your Dogewallet.
Click here for a video on how to add new addresses to your Dogewallet.
IV. How Do I Send/Receive an Asset?
Sending and receiving assets is the same as sending/receiving DOGE in your Dogewallet. Assets are individual tokens stored in your address and are transferred independently of DOGE. This means you can have a balance of zero DOGE but still own assets. It does require 1 DOGE to send any amount of assets from your Dogewallet, however.
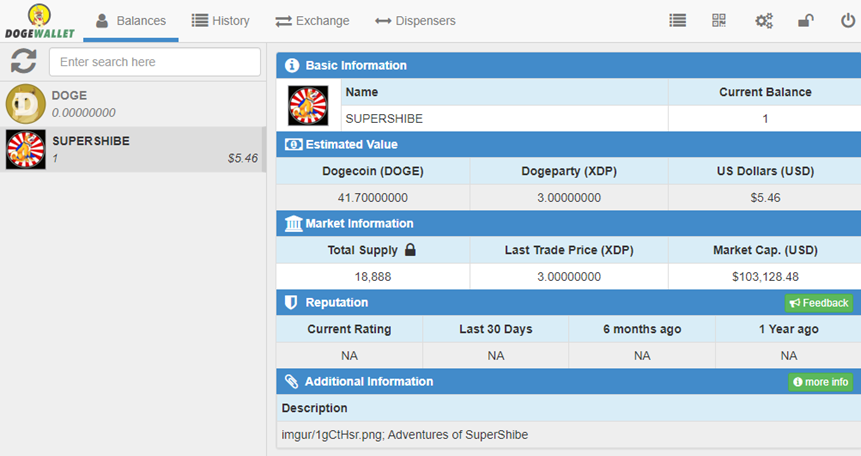
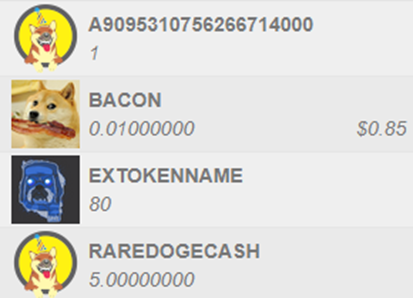
To receive an asset, simply provide the sending party with your Dogeparty address. After the send transaction has been confirmed by the Dogecoin network, the asset will be displayed in your Dogewallet (press the refresh button if it is not already displayed). Clicking on an asset will display its details in the main window. Here is what a wallet looks like with a single asset:
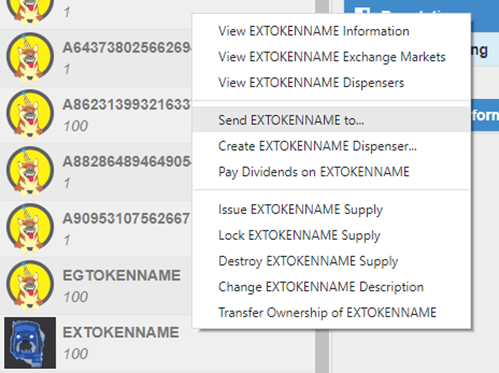
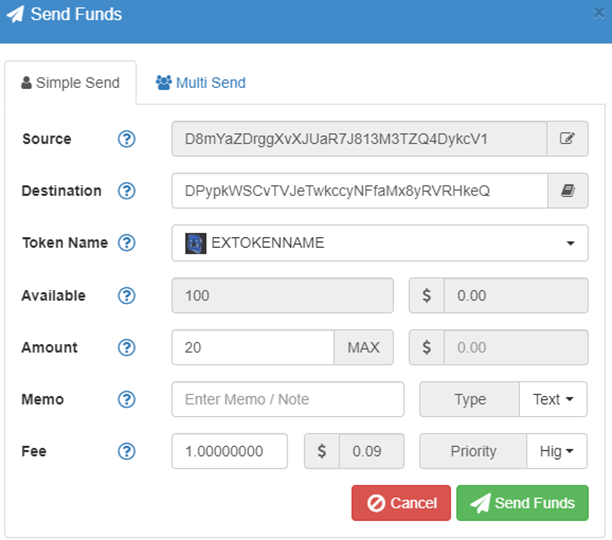
To send an asset, right-click it and select “Send (TOKENNAME) to…”.

Note that you must first have at least 1 DOGE in your wallet to send an asset. Next, paste the address to which you want to send the asset in the Destination field, and enter the quantity to be sent in the Amount field.
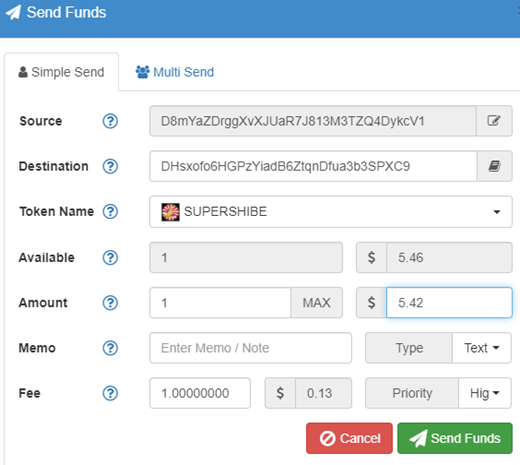
After double-checking that the Destination address and Amount to be sent are correct, click “Send Funds”. You will be greeted by a popup confirming that you want to make the transaction. Press “Yes” to complete the send. Granted you have the 1 DOGE to cover the transaction fee, your asset will now be on the way to its new owner.
You will then be greeted by a new popup with a green “View Transaction” button in the middle. Click it if you’d like to see the blockchain entry for this transaction on the xchain block explorer. Here you can see the details of your transaction and check on its confirmation status.
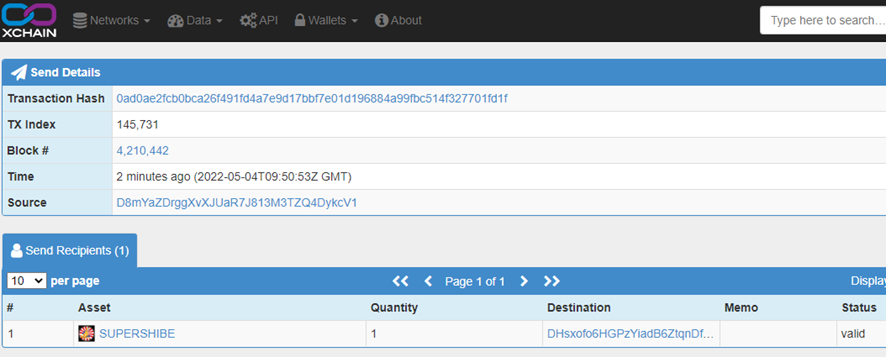
We can see the transaction confirmed two minutes ago and was included in block #4,210,442 on the Dogecoin blockchain. You can share this link with the transaction recipient as proof that an asset has been sent.
Click here for a video explanation of how to send an asset/token.
V. How Do I Create an Asset?
Creating an asset – or token – in Dogeparty is quite simple. It does not require any kind of programming knowledge but simply following these instructions. First off, you should know there are two types of Dogeparty tokens: Named and Numeric.
Numeric tokens (unnamed) begin with the letter “A” followed by a series of digits. They do not require XDP to create — only the 1 DOGE transaction fee.
Named tokens allow you to name the asset and require 0.5 XDP; XDP being Dogeparty’s native “utility token”. Creating a Named token also requires a transaction fee of 1 DOGE.
Most likely you will want to mint a Named token, which means you will need at least 0.5 XDP to create it. The easiest way to purchase XDP is to buy it from a Dispenser (which we explain in the section below).
Numeric Tokens
For demonstration purposes, let’s first create a Numeric token:
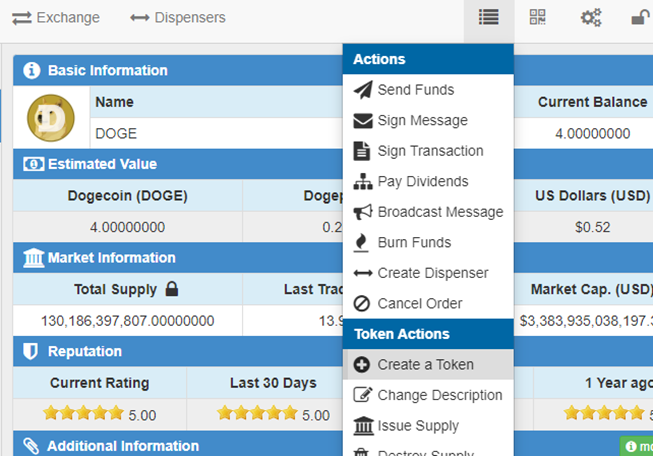
1. To get started, click on the Actions button in the top bar of the Dogewallet, which is the 5th button from the left (closest to the word “Dispensers”). Then under Token Options, click “Create a Token”.
2. The next thing you’ll want to do (since we’re creating an unnamed token) is to toggle the token Type from “Named” to “Numeric (free)”.
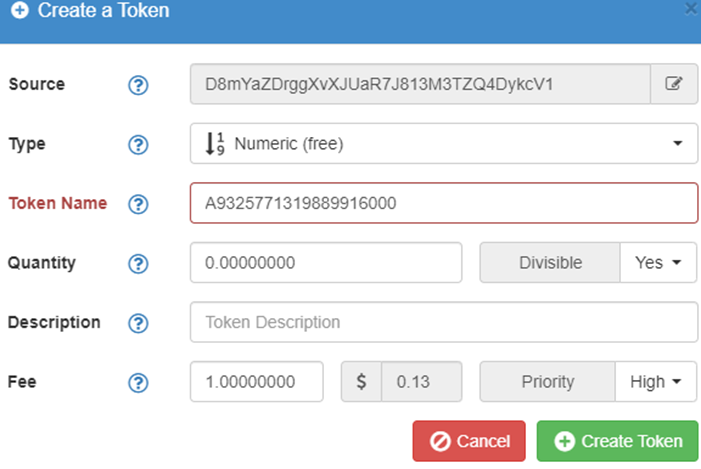
Here are the programmable variables for each token:
Type: Named (cost 0.5 XDP), Subasset (cost 0.25 XDP), Numeric (free)
Token name (between 4 and 12 characters, not available for Numeric assets)
Quantity (number of tokens to be created, between 1 and 100 billion)
Divisible (“Yes” if you want your token to be divisible by 8 decimal places, or “No” for non-divisibility – if you are planning on making an NFT-type asset, you’ll want to select “No”)
Description (token description up to 32 characters in length*)
*Note that you can enter a Description up to 250 characters in length for Numeric tokens, but it will cost an extra fee (up to 13 DOGE) to create them.
Keep the Fee at 1 DOGE (the minimum fee for any Dogeparty transaction) and Priority as “High”.
Attaching an Image
If you want to attach an image to your token:
This is accomplished in the Description field by adding the URL to the image file at the beginning of the description (note these files end with a suffix like “.jpg”, “.gif”, “.png”; also works with “.json”).
If you are adding the image from imgur.com, you can abbreviate this text by dropping the “http://” and “.com” parts of the text. For example, “imgur/AgzTcvS.jpg” will display an Imgur-hosted image in the Description field on the block explorer.
Click here for a video explanation of how to attach an image to your token.
Click here for a video on how to use JSON files for Dogeparty tokens.
Click here for a video on how to use IPFS links in JSON files.
3. After you have reviewed your variable choices to make sure they are entered the way you want them, press “Create Token”. A confirmation popup window will appear asking you if you would really like to create this token. If you are sure you have entered everything correctly, press “Yes”. Assuming you have enough DOGE in your wallet to cover the miner’s fee, the transaction will be sent to the mempool where it will take about a minute before being picked up by a miner and included in the next Dogecoin block.
4. You will then be shown a link with the transaction ID for your token creation transaction. Click on it to view the progress of the transaction in the xchain.io block explorer. There will be a message that says “This is an Unconfirmed / Pending Transaction” at the top of the transaction entry until after it has been included in a Dogecoin block, at which point your token will have officially been created.
Named Tokens
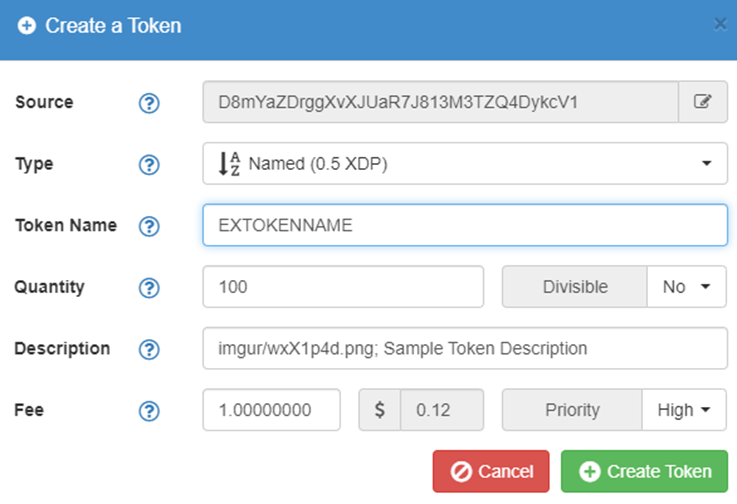
Here’s how to create a Named token with an image (NFT-type token), which is likely the whole reason you’re here (note that you will need at least 0.5 XDP in your wallet to create a Named token — skip down to the next segment to learn the fastest way to obtain XDP):
1. Click the Actions button in the Dogewallet menu area and select “Create a Token”
2. In the Create a Token popup, leave the Type as Named. Configure your token parameters:
Token name (between 4 and 12 characters)
Quantity (between 1 and 100 billion)
Divisible (select “No” for non-divisibility if you are planning on making an NFT)
Description (token description up to 32 characters in length)
As described above, you will want to place the URL to your image file at the beginning of your Description. You can add additional text by separating it with a semicolon. You can also shorten the URL if you are attaching an imgur file removing the “https://” and “.com” parts of the URL. For example:
3. Press “Create Token” after double-checking you have set your parameters correctly. You will then be greeted by a popup window asking you to confirm issuance of the token.
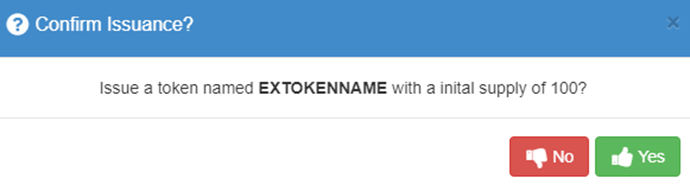
4. If you are sure you want to make the token with this name and supply, click “Yes”. If you have enough DOGE and XDP in your wallet, you will then be greeted with another window that says, “Your issuance has been broadcast to the network and your token should be created shortly.” Click the “View Transaction” button if you wish to follow the progress of the token issuance on the blockchain. It should be confirmed and appear in your Dogewallet within 1-2 minutes. It will look like this on xchain after the issuance transaction has been confirmed:
Issue/Lock Supply
The next thing you’ll probably want to do is Lock your token supply. This prevents new tokens from being added. If you made a mistake and wanted to issue a higher supply, right-click your token in the left column of the Dogewallet and select “Issue (Token Name) Supply”. Enter the number of new tokens you wish to add and click “Issue Supply”.
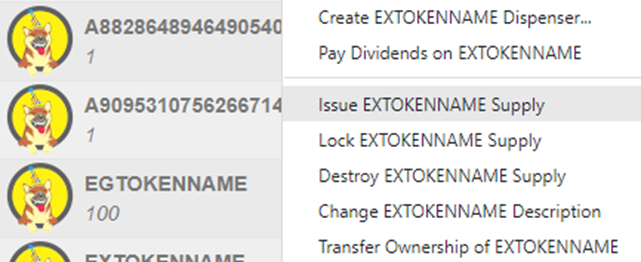
If you are ready to lock the supply, right-click the token and select “Lock (Token Name) Supply”.
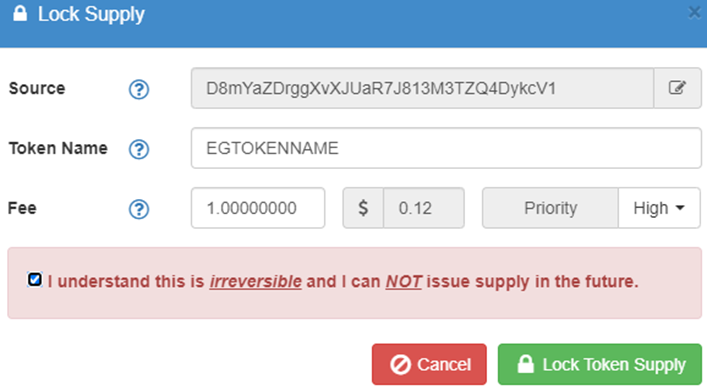
Note you must tick the box next to “I understand this is irreversible and I can NOT issue new supply in the future” before proceeding. This is to make sure you are acutely aware of the consequences of this action. If you are sure that your total supply is correct, press “Lock Token Supply”. Next, confirm that you want to lock the supply by pressing “Yes”. You can view the progress of the transaction by pressing “View Transaction”.
Keep in mind that both Issue and Lock transactions require a fee of 1 DOGE.
Click here for a video on how to issue or lock token supply.
6. And that’s it! Your token is now ready to be sent and/or sold. You’ll notice that some tokens have representative icons when listed in the Dogewallet (such as DOGE, for example). Icons are automatically generated within 24 hours from token creation, so it may take a while before you see it next to your token in the Dogewallet.
Click here for a video explanation of how to create an asset/token in the Dogewallet.
VI. What is a Dispenser?
The Dispenser is an innovative feature that was added to the Counterparty protocol years after launch. It allows anyone to purchase tokens in an automated and trustless manner by sending a specified amount of DOGE to an address controlled by the seller. After a dispenser is opened by a token seller, who specifies the price and quantity of tokens being sold, the purchase process is automatic, and the dispenser remains open until all escrowed tokens have been sold (or until the seller closes it).
Buying from a Dispenser
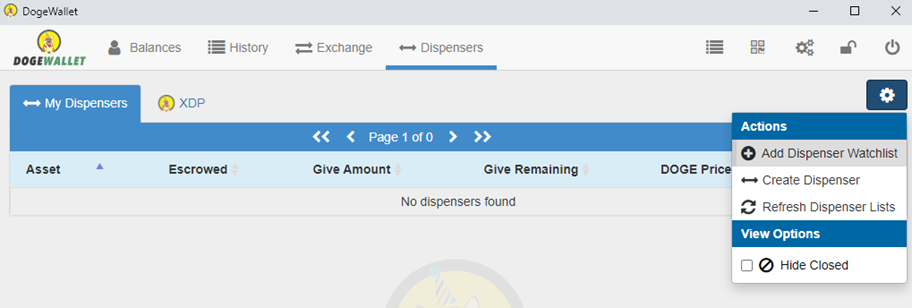
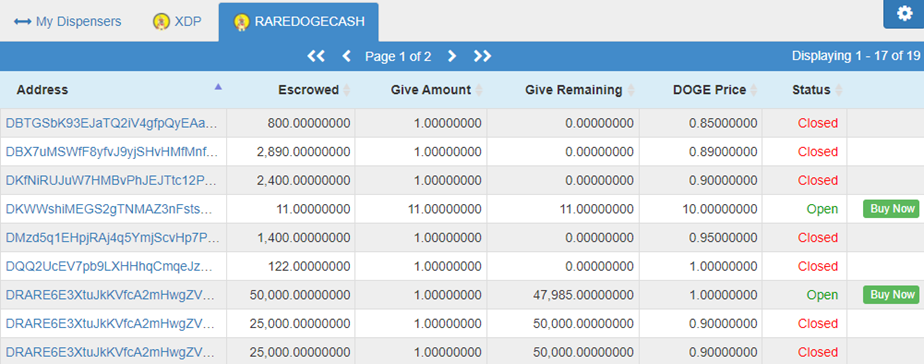
If you want to buy tokens from a dispenser, all you need to know is the Dogecoin address from which it was opened, and the price of the token being sold. There are a couple of different ways to go about this. The first is to visit the token’s list of Dispensers on xchain. The second is click the Dispensers tab in the Dogewallet, click the Settings icon in the upper-right corner of the screen, and then select “Add Dispenser Watchlist” (Dogeparty’s utility token, XDP, is added by default).
Next, enter the token name for which you want to find an active dispenser and press “Add Watchlist”.
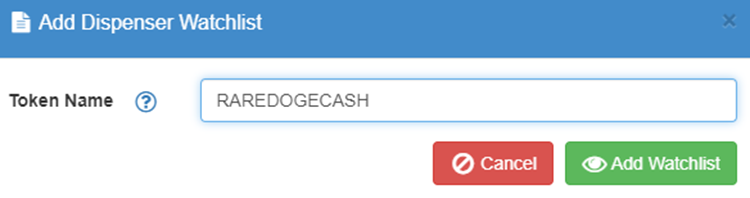
You will now see a list of token dispensers (in this case, for RAREDOGECASH); some open, some closed.
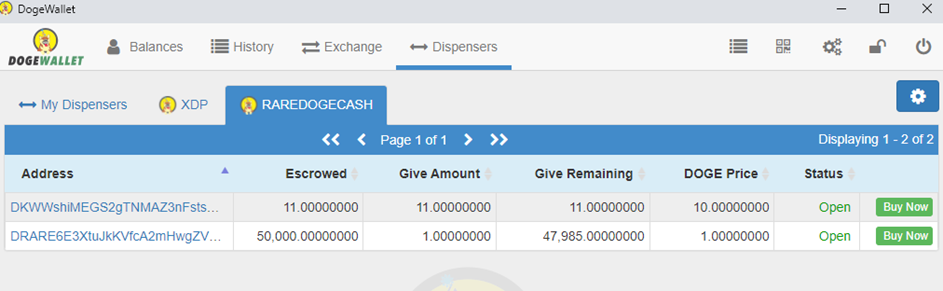
Clicking on the Settings icon and checking the “Hide Closed” box will remove the closed dispensers from the list displayed. We are now left with two open dispensers, one selling 11 RAREDOGECASH for 10 DOGE, and one selling 1 RAREDOGECASH for 1 DOGE:
For this example, let’s say we just want to buy 5 RAREDOGECASH. We would select the second dispenser by clicking the “Buy Now” button on the right. This will bring up the dispenser’s Buy order menu. We’re putting “5” in the Amount field because we want to buy 5 tokens.
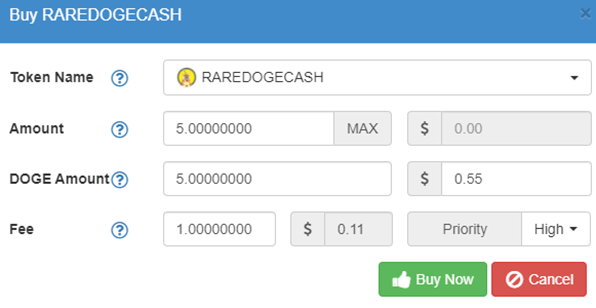
Thusly, the DOGE Amount becomes 5, and with a Fee of 1 DOGE we are spending a total of 6 DOGE to make this purchase. Press the “Buy Now” button to complete the purchase. If you have enough DOGE to cover the transaction, you will receive this message:
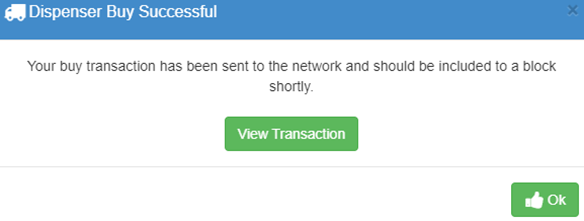
You can follow the progress of the Buy order on the xchain block explorer by pressing “View Transaction”; otherwise press “OK” to return to the wallet. The newly-purchased token will appear in your Balances after a couple of minutes (click the refresh button if it doesn’t).
Click here for a video explanation of how to buy assets/tokens from a dispenser.
Buying XDP from a Dispenser
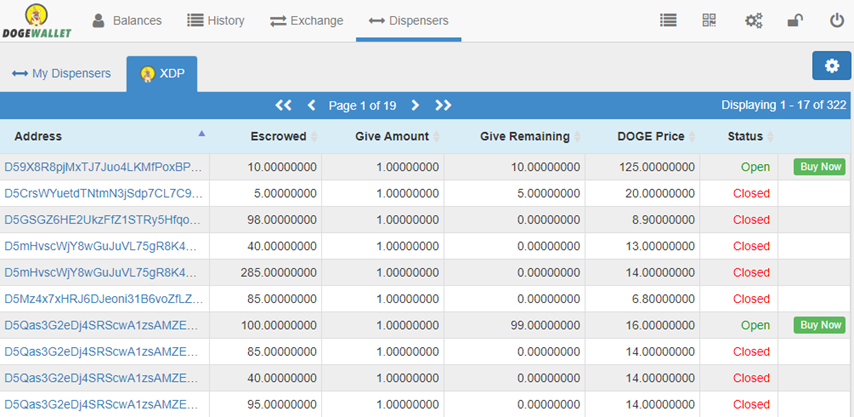
This dispenser purchase process can be repeated for any Dogeparty token, including XDP, which is the platform’s “utility token” that is needed to create Named tokens and pay dividends. Note that dispensers are by default listed by the date they were created and not by order of price. You can always sort them according to price by clicking on the “DOGE Price” column. Be sure to check the quantity in the Give Amount column to make sure you aren’t buying less than 1 token at what is a more expensive per-token price.
1. To buy XDP from a dispenser, first click on the XDP tab in the Dispensers menu.
2. Next, click the Settings icon in the upper-right corner and check the “Hide Closed” box. Then click the “DOGE Price” column title to sort by lowest price first.
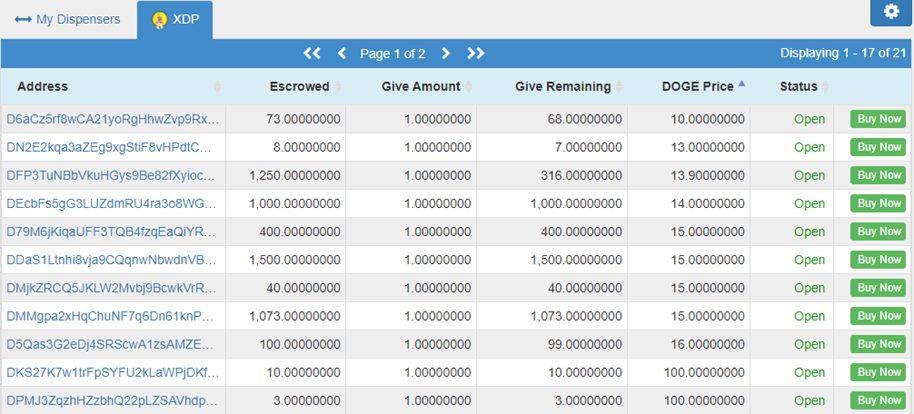
3. The cheapest XDP is currently being sold for 10 DOGE / each (shown in the first row above). Click the “Buy Now” button in the right-most column to make a XDP purchase at this price.
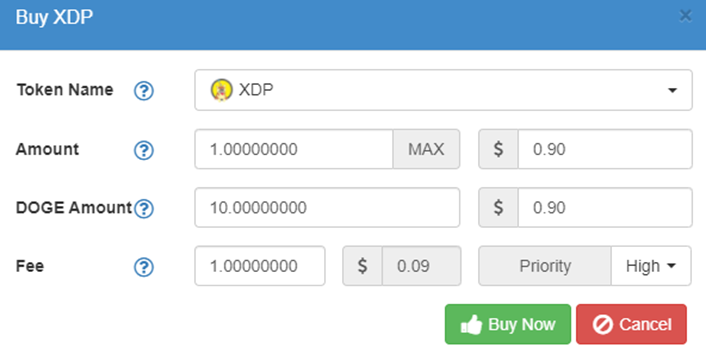
4. Adjust the quantity you wish to purchase by changing the number in the Amount field to the desired quantity (for this example we’re only buying 1 XDP @ 10 DOGE). Press “Buy Now” to begin the purchase. You will then be asked to confirm the purchase.
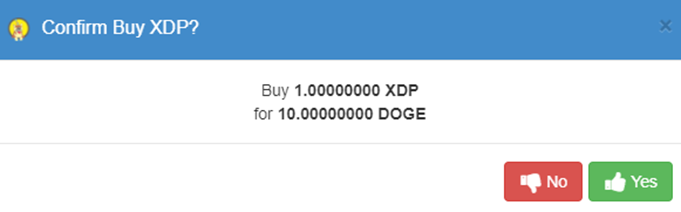
5. Press “Yes” to proceed. If you have enough DOGE in your wallet, you will be greeted with the following message:
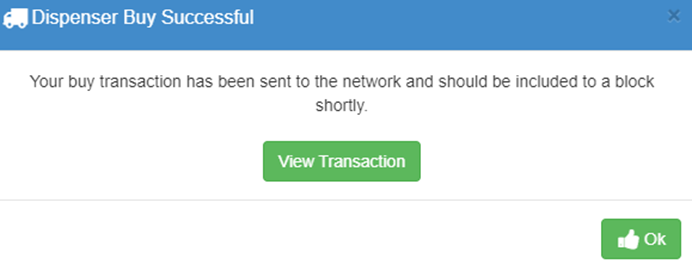
6. Press “View Transaction” to follow the progress of the transaction on xchain, or else press “OK” to go back to your wallet.
7. Click on the Balances tab in your wallet. After the transaction has confirmed on the blockchain, your newly-purchased XDP will appear under your DOGE balance. If you don’t see it, click the refresh icon immediately above the DOGE logo. And that’s it! Congratulations, you are now a XDP owner and can begin making your own Named tokens on Dogeparty.
Selling from a Dispenser
Once you’ve created or bought some tokens and want to sell them, opening a dispenser of your own is the easiest way to do so, and setting it up is a breeze.
One thing to be aware of is you should never open more than 1 dispenser at the same Dogewallet address! Doing so can result in different tokens being dispensed for a single incoming payment. To avoid this, we recommend setting up a dispenser from a new address each time you want to open one. First, let’s choose the new address at which we want to open the dispenser.
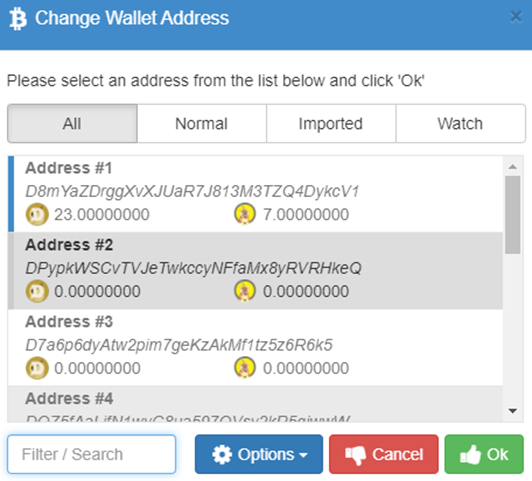
1. Click the Addresses button (QR code icon) and select “Change Address” under Address Actions.

2. Here you will see a list of Dogecoin addresses contained in your Dogewallet. The wallet opens to the first address by default. Click on “Address #2” to switch the wallet view to a new address, then press “OK”.
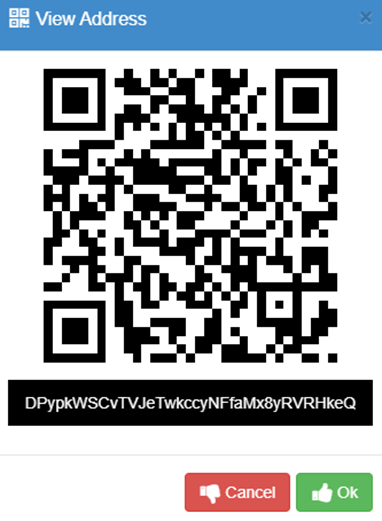
3. You will see a message that says “Your wallet address has been changed to D….”. Press “OK”. Notice that the displayed DOGE & token balance is now empty. This is because you do not have any tokens in this address. Now, click the Address button (QR code icon) and select “View Address”. This will bring up the address in QR code and text form.
4. Double-click the address to highlight it and copy it to your clipboard, then press “Ok”. Now, go back to your default address by once again clicking the Address button, then “Change Address”, then selecting Address #1. If the display does not update, click the Balances tab or the refresh button. Next, right-click the token you want to create a dispenser for and select “Send (Token Name) to…”.
5. Next, paste the address copied to your clipboard in the Destination field and enter the quantity of tokens you wish to send for the dispenser in the Amount field. For this example, we are sending 20 tokens.
6. Press “Send Funds” when you are ready to proceed and then “OK” to confirm. This action will cost a transaction fee of 1 DOGE. You will then be greeted with a message that says “Your send has been broadcast to the network and should complete shortly.” Press “OK” to proceed.
7. The next step is to fund your new address with a few DOGE since you will need at least 1 DOGE to open the dispenser. Repeat the previous procedure, except this time for DOGE instead of your token. For this example, we are sending 5 DOGE to our Address #2:
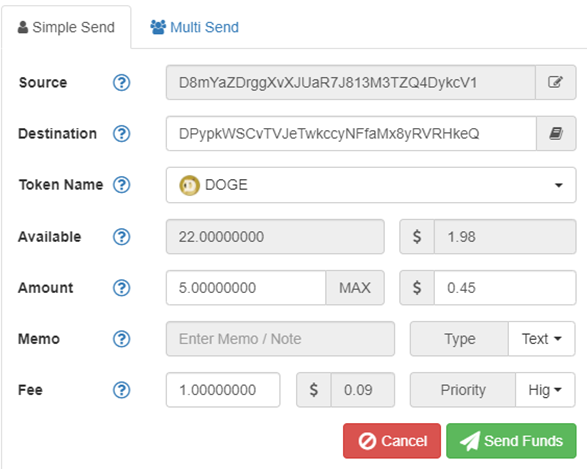
8. Again, we press “Send Funds”, “OK” to confirm, and “OK” once again to proceed.
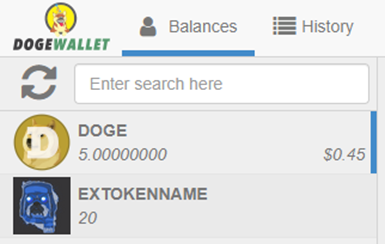
9. We are now ready to open the dispenser, so go back to your Address #2 by clicking Address->Change Address->Address #2. We can now see the DOGE and tokens in our Balances:
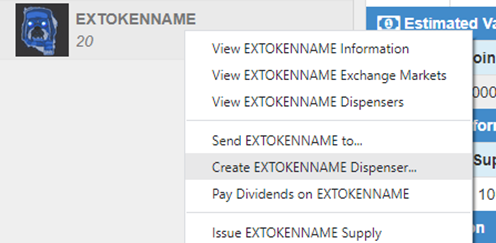
10. Right-click the token you are creating a dispenser for and select “Create (Token Name) Dispenser…”
11. Now you will be brought to the Create Dispenser window. It’s very important to pay attention to what you are entering here because you want to make sure you have entered all your variables correctly before opening the dispenser.
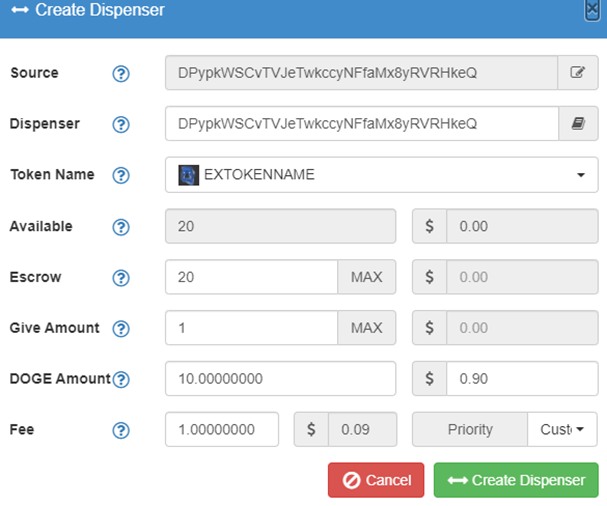
Escrow = how many of tokens you want to put in the dispenser (all 20 in our balance for this example)
Give Amount = how many tokens you want to dispense at a time for the price entered below (1)
DOGE Amount = price at which you are selling the Give Amount of tokens (10 DOGE)
Fee = always set to 1 DOGE
So, in the screenshot above we are effectively selling 20 tokens for 10 DOGE / each. This means that for every 10 DOGE sent to this address, the sender will receive 1 token. The send process happens automatically and continues until the dispenser is emptied or you choose to close the dispenser.
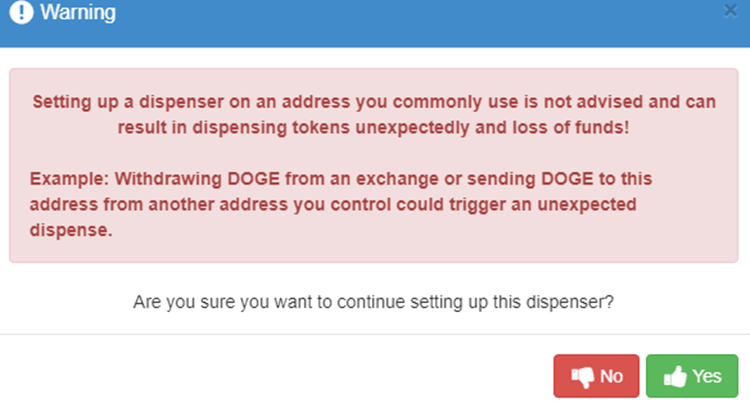
12. Press “Create Dispenser” when you are ready to proceed. If you have used this address for anything before, will see the following warning message.
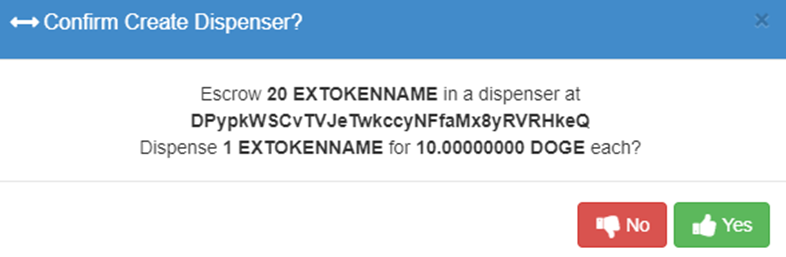
If you’ve opened dispensers before, it’s a good idea to double-check to make sure you do not already have a dispenser open at this address before continuing. If not, press “Yes” to continue. You will now be brought to the confirmation screen. Double-check to make sure the details of your dispenser are correct.
13. If everything looks correct, press “Yes” to open the dispenser. If you have at least 1 DOGE in your wallet, you will see a popup confirming the open dispenser transaction has been sent:
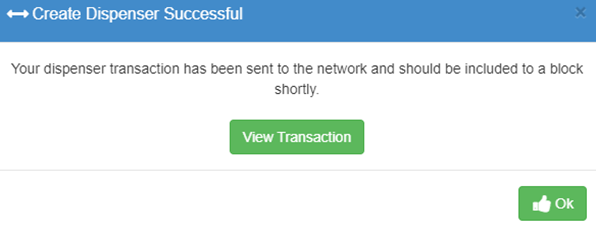
14. Press “View Transaction” to look at the dispenser transaction on the xchain block explorer. After 1 confirmation by the Dogecoin network, we will see the details of the dispenser and that it is now live:
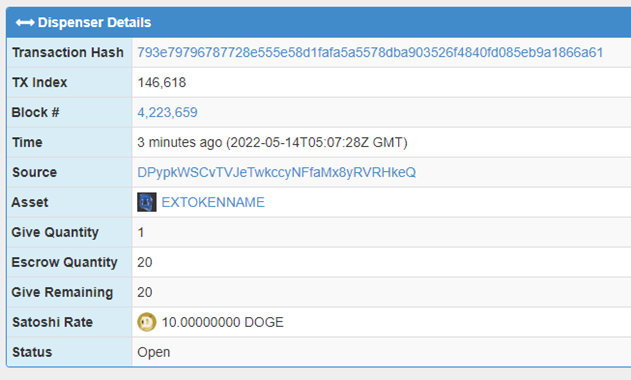
Note: If you see a message that says “No Dogeparty information could be found for this transaction”, just refresh the browser window in 30 seconds. It should appear by then.
Sharing this transaction link will allow other Dogeparty users to be informed of your token sale and make a purchase as it provides all the details necessary to do so.
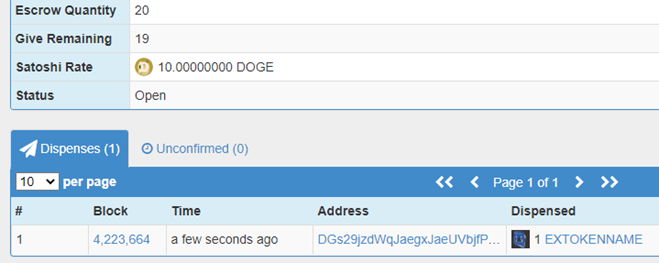
Below the Dispenser Details is a record of dispenses, confirmed and unconfirmed. After a sale has been made, it will be displayed in this area.

You can also track dispenses from the Dogewallet by clicking on the Dispensers tab and selecting your token:
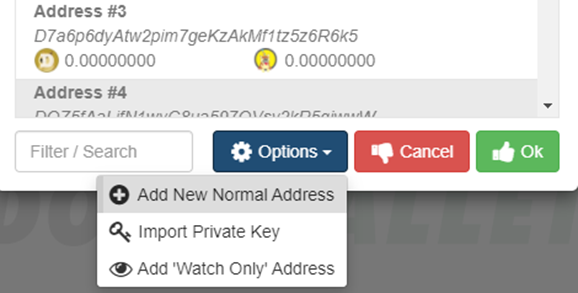
As we explained earlier, setting up multiple dispensers at a single address is a bad idea as this could cause different tokens to be dispensed for a single incoming DOGE transaction. Therefore, you will want to choose a new address (Address #3, for example) when setting up your next dispenser. The Dogewallet lists 10 addresses by default, but you can add an infinite number of new ones by clicking “Add New Normal Address” in the Options section of the Address menu.*
Click here for a video explanation of how to create a dispenser.
WARNING: If you are sending yourself DOGE from an exchange, don’t send it to a Dogewallet address from which you have opened a dispenser! This will cause the dispenser to send tokens to the exchange, meaning you will lose them, and they cannot be recovered.
* Note that you can find your private keys for Dogewallet addresses by clicking Address Actions and then “View Private Key”. Saving these keys in a place as secure as your passphrase will assure that you can always access DOGE balances using a standard Dogecoin wallet.
VII. What is the Exchange?
The Exchange is a feature built into the Dogewallet that allows users to exchange any Dogeparty asset for any asset by placing an order. The most popular trading pairs on the exchange are backed by XDP which serves as the principal currency of the exchange. It is possible to also open DOGE-backed trading pairs, although this is a bit more complicated and time-consuming. Additionally, users can trade tokens they created against one another, setting buy and sell orders and creating their own, custom trading pairs. This is a great way to trade tokens with other users in a trustless manner.
The Dogewallet Exchange looks and functions similarly to a traditional exchange except it does not rely on a central authority to hold user assets. Instead, assets are held by an automated escrow system built into the Dogeparty protocol. This makes the exchange a true DEX, or Decentralized Exchange. It is the easiest, most secure, and trustworthy way to make a trade for an asset or NFT that exists on any blockchain. It also only costs 1 DOGE to place or fill an order, and it is available to anybody around the world.
Finding a Trading Pair
While it is possible to browse through all the trading pairs currently listed on the Exchange, this is a bit messy and hard to do. Instead, we recommend just searching for a particular trading pair you had in mind.
1. To find a trading pair in the Dogewallet, first click on the Exchange tab and then enter the search pair you want to visit in the following format:
TOKENONE/TOKENTWO
2. Next, press Enter on your keyboard to proceed (clicking the Search icon will not work due to a glitch in the wallet). As an example, this is how we would find the BACON/XDP trading pair:
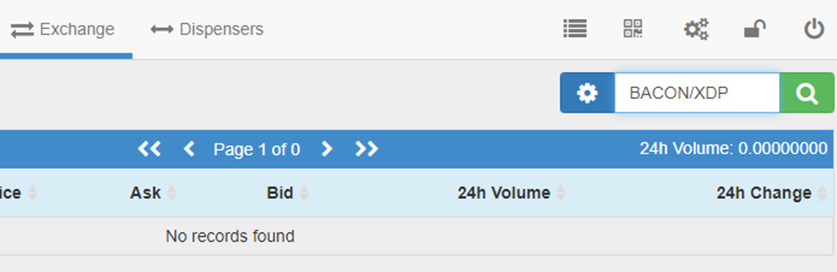
We then press Enter on the keyboard to pull it up on the trading screen. The top third of the trading screen looks like this:
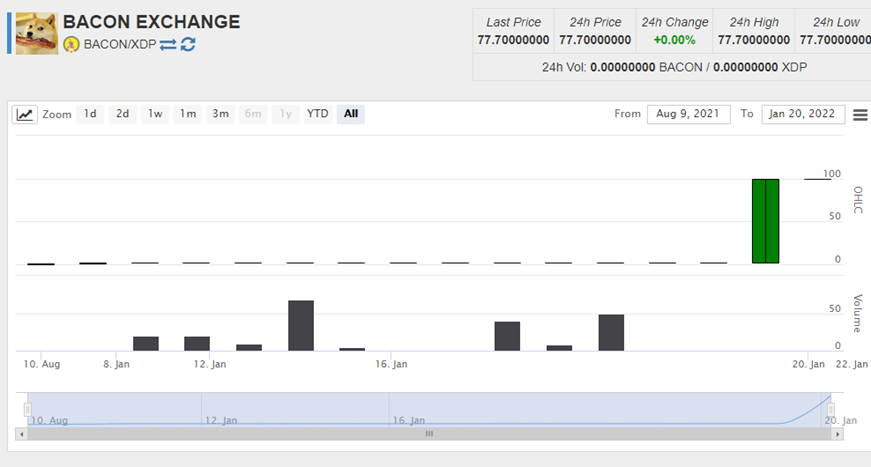
Here we can see the following components:
Price & trading volume statistics in the upper-right
Price chart (similar to how it would appear on a centralized exchange)
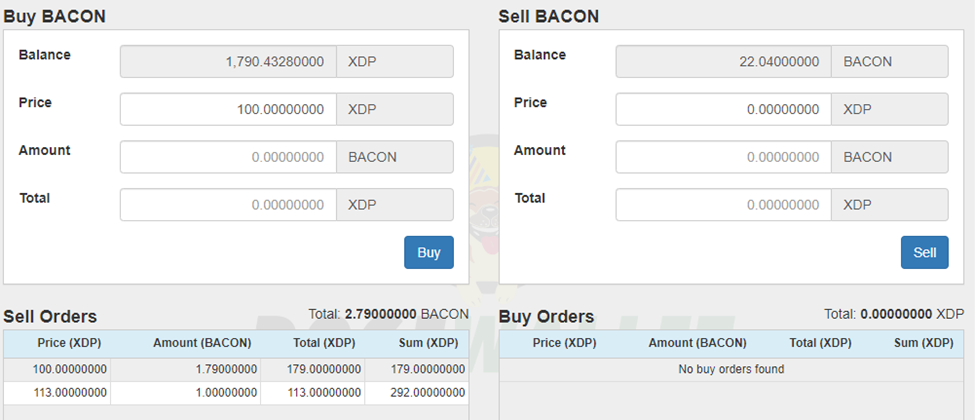
Scrolling down to the middle third, we see the Buy/Sell screens and their orderbooks:
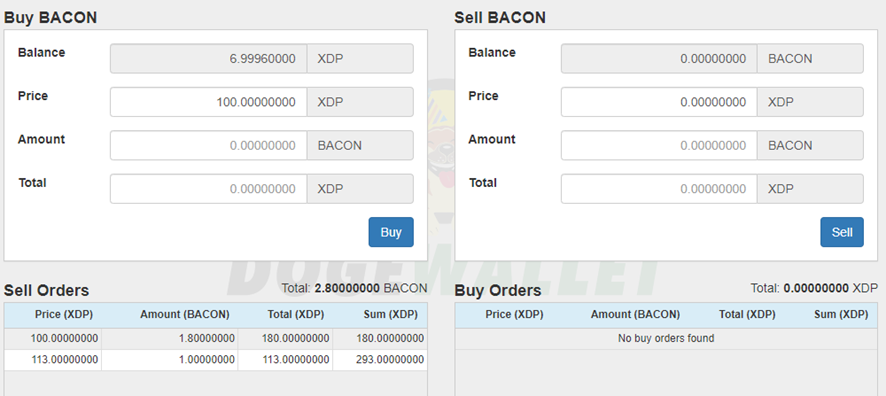
Here we can see that there are two sell orders for BACON and zero buy orders. The cheapest BACON price is 100 XDP. There is a total of 1.8 BACON being sold at this price. If you wanted to put in a buy order at a lower price, you would simply name your own price on the Buy side and the amount you are willing to purchase at this price. Of course, you must have at least the total amount of XDP you are willing to spend available in your wallet, otherwise the order will not be placed.
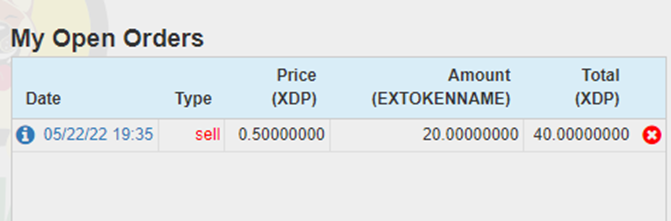
Scrolling down to the lower third of the trading screen, we see the Market Depth, Trade History, and My Open Orders sections:
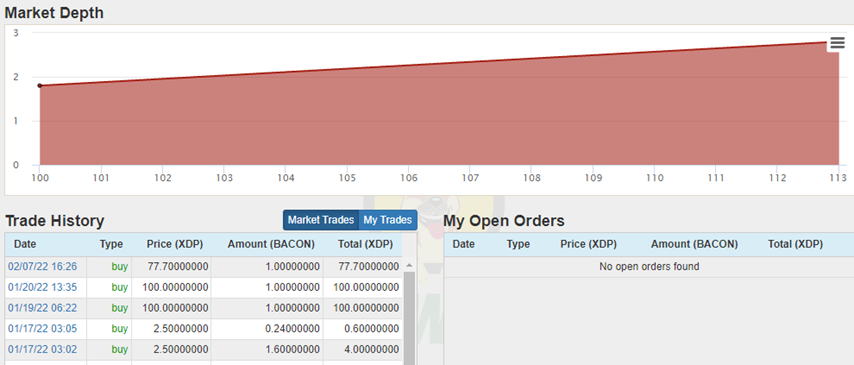
For this particular trading pair (BACON/XDP), the market depth is all on the sell side, which is why it is all red. We can see the last trade was made on February 7th, 2022, in which one BACON was bought at a price of 77 XDP. We can also see that we have no open orders for BACON.
Filling an Order
Filling a sell or buy order on the exchange is quite simple. Much like a regular exchange, all you need to do is click on the orderbook entry to populate its details into the buy/sell box. For example, if we wanted to buy BACON:
1. Click on the lowest-price sell order and adjust the amount we wish to purchase. Pressing the Tab key on the keyboard after adjusting the Amount field will update the Total to reflect how much XDP we are about to spend.
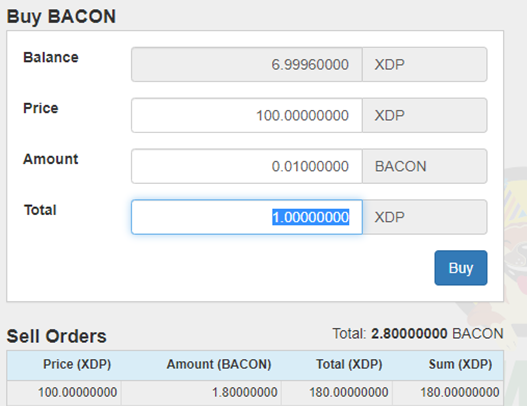
2. After you have reviewed the details of your buy order to make sure they are correct, press “Buy” (note that in this example we do not have enough XDP to purchase an entire unit of BACON, but because BACON is a divisible asset, we can purchase 1/100th, or 0.01 BACON).
3. Next, you will be asked to confirm your order.
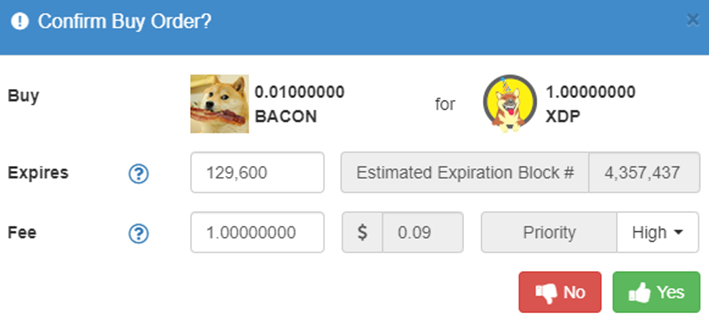
4. If everything looks good and you’re sure you want to make the purchase, press “Yes” (leave the other fields as they are by default – fee always equals 1 DOGE). Granted you have enough XDP in your wallet to make the purchase (and 1 DOGE for the transaction), the order will be broadcast to the Dogecoin network. Press “OK” to proceed or “View Transaction” if you want to follow the status of the order.
Filling an order usually takes at least 2-3 minutes in the Dogewallet, as purchase/sale and escrow processes are performed as a series of transactions on the Dogecoin blockchain (as opposed to traditional exchange software which processes orders instantly).
5. Head back to your Balances tab, and if you don’t already see the recently-purchased asset, press the refresh icon once every minute until it appears. After the purchase process is finished, the token will appear in your address balance.
Creating a New Order
Let’s say you think the price of BACON is too expensive and you want to make a buy order at a lower price. This is the same as creating a Limit Order on a traditional exchange and involves a similar process.
1. First pull up the trading pair in the Exchange tab (in this case, BACON/XDP) and scroll down to the middle segment. There are currently two Sell orders (one of which we purchased from earlier) and zero Buy orders. We can see that the lowest sell order price is set by default.
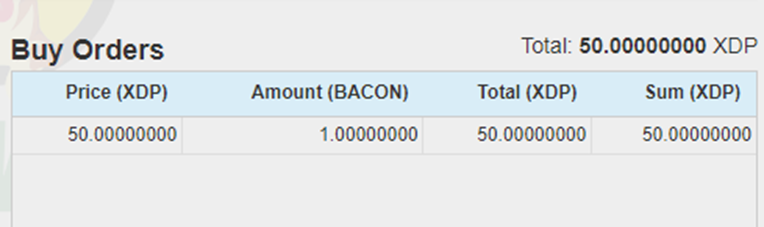
2. To create a Buy order at a lower price than the cheapest Sell order, simply type a new (lower) price in the Price field and enter the quantity you wish to purchase at that price in the Amount field. For example, this is how placing a Buy order for 1 BACON at 50 XDP would look:
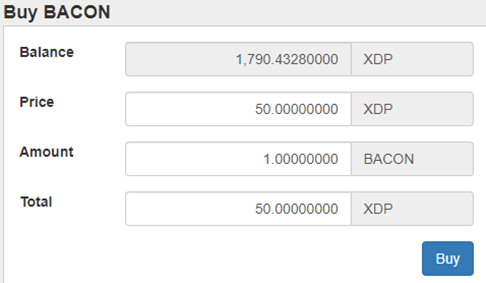
3. After reviewing the Price, Amount, and Total, press “Buy” to proceed. Next, you’ll be asked to confirm your order.
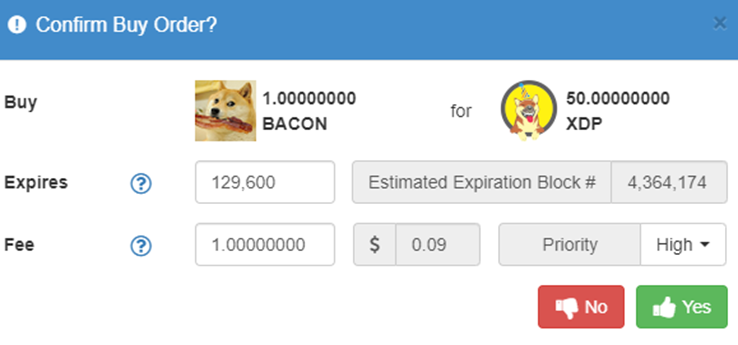
Notice that the order “expires” after 129,600 blocks, which is roughly 90 days. If the order is not filled by the end of this period, it will be removed from the orderbook, and the XDP will be returned to your wallet. You can adjust this to a shorter block period (1 block = ~1 minute) if you want it to expire faster.
4. If you don’t want to adjust it, and the details of the order are correct, press “Yes” to confirm. The transaction will then be broadcasted to the network, and in 2-3 minutes, your order will appear in the orderbook for this trade pair. Press the refresh icon toward the top of the screen to make it appear.
The order is now active, waiting to be filled by a seller who finds this to be an agreeable price. It will also appear in your “My Orders” window, found in the right column under the Market Depth chart.
Creating a New Trading Pair
Let’s say you want to trade your NFT for XDP, or one NFT for another. This can also be done through placing a custom order in the Exchange. The process is quite simple and is performed in the same way you go about placing a Buy/Sell order for pre-existing trading pairs. The only difference is, the orderbook will start empty and the chart will be barren as no trades have been made for it yet.
For this example, let’s create a trade pair for our previously-made EXTOKENNAME with XDP.
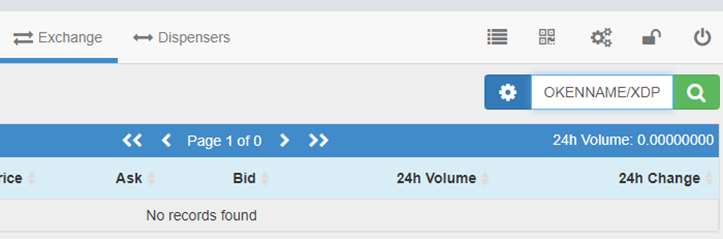
1. First, we’d type EXTOKENNAME/XDP in the Exchange search field and hit Enter on the keyboard:
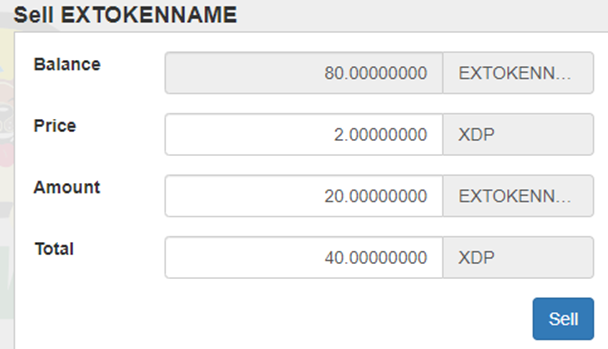
2. Next, we scroll down to the “Sell EXTOKENNAME” box and type in our order details. For this example, we are selling 20 EXTTOKENNAME at 2 XDP each, so our sell order will look like this:
3. After reviewing the details to make sure they are correct, press “Sell”. Next, alter the block expiration length if desired, and press “Yes” to confirm the order. Then press “OK” to return to the order pair screen. In a couple of minutes, our Sell order will appear in the orderbook as such (press the refresh icon toward the top of the screen to make it appear after it has been confirmed by the network):
Note that orders can be cancelled at any time by pressing the “x” in the red circle on the right.
Click here for a video explanation of how to list assets/tokens on the Dogewallet Exchange.
DOGE Trading Pairs
It is possible to create trading pairs against DOGE, but this is not recommended as the Dogewallet is somewhat unpredictable as to whether orders will actually be fillable or not. This portion of the Exchange still suffers from bugs, and for this reason we recommend avoiding it. Theoretically, DOGE pair orders can be matched so long as:
1. the market taker (market order buyer/seller) leaves their wallet open for the 4-6 minutes it takes for the Exchange escrow process to complete, and
2. nobody has previously tried to fill the order before and failed.
If both these conditions are met, it is possible the order will go through. If it turns out they are not, the order will be stuck pending indefinitely and must be manually cancelled for the DOGE or tokens to be released back to the owner’s balance. While you will not lose your DOGE placing these types of orders, we do not recommend attempting to do so, for the time being.
Click here for a video on how to place token orders with DOGE on the Dogewallet Exchange.
VIII. What are Some of the Other Things I Can Do With Assets?
There are some token attributes that can be modified after creation, including increasing/decreasing the total supply, changing its description, and transferring ownership to another address. You can also pay token holders dividends in the form of any other token, or even DOGE itself. You can even create subassets which are basically “child tokens” that use the token name as a “parent” name (sort of like subdomains on the internet).
All these operations cost a transaction fee of 1 DOGE, except for dividends, which require a varying amount of XDP (dependent on the number of addresses to which dividends are being sent).
Change Description
To change a token’s description, right-click it in your balances list and select “Change (TOKENNAME) Description”. Note that descriptions have a maximum length of 48 characters, including spaces. This is an especially handy feature for those who need to correct a mistake in their initial description or if the URL supporting the attached media file becomes invalid. Descriptions can be changed at any point by the token owner, even if the supply of the token has already been locked.
Destroy Supply
If you accidentally created too many tokens or want to whittle down your supply, the Destroy Supply option can be used to remove them from the system entirely. This is different from sending coins or tokens to a burn address as “burned” funds are not removed from the total supply. To destroy a token supply, right-click the token in your balances list and select “Destroy (TOKENNAME) Supply”. Enter the quantity you wish to destroy in the Amount field. Note that you can only destroy tokens that exist in your wallet balance. You can destroy any token in your balance.
Click here for a video explanation of how to destroy token supply.
Transfer Ownership
In Dogeparty, “ownership” refers to having control over the ability to make changes to a token. Ownership is assigned to the token creator’s address upon its creation. Things that can be done with token ownership include issuing supply, locking supply, changing the token’s description, paying dividends on that token (explained in the section below), and transferring ownership. To transfer token ownership, right-click on that token and select “Transfer Ownership of (TOKENNAME)”. Enter the address to which you want to transfer ownership and press “Transfer Ownership”.
Click here for a video explanation of how to transfer ownership of an asset/token in the Dogewallet.
Pay Dividends
The Pay Dividends feature in the Dogewallet works just as its name implies: it allows dividends to be paid to all holders of a token of which the payer possesses ownership. Dividends can be paid in the form of any Dogeparty token (including XDP) and even DOGE. To pay a dividend, right-click the token on which dividends are to be paid and select “Pay Dividends on (TOKENNAME)”. Then select the denomination of the dividend (token to be paid) and the amount to be received by each holder per unit they hold.
For example, if we wanted to send 0.01 BACON to each GOLDENSHIBE holder, we would fill out the Pay Dividends screen like this:
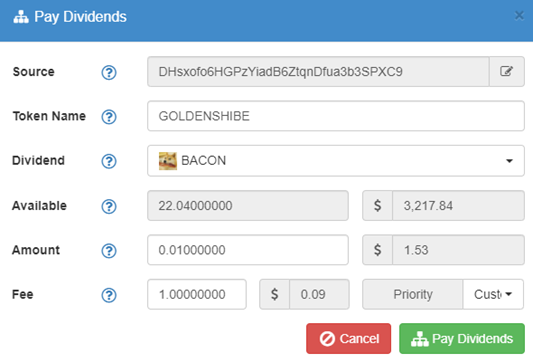
This will send 0.01 BACON for every unit of GOLDENSHIBE held by other addresses. This means that if somebody held 10 GOLDENSHIBEs in their wallet, they would receive a total dividend payment of 0.1 BACON. Using the Pay Dividends features requires a small amount of XDP (0.0002 XDP per dividend recipient).
Click here for a video explanation of how to use the Dividend feature in the Dogewallet.
Create Subassets
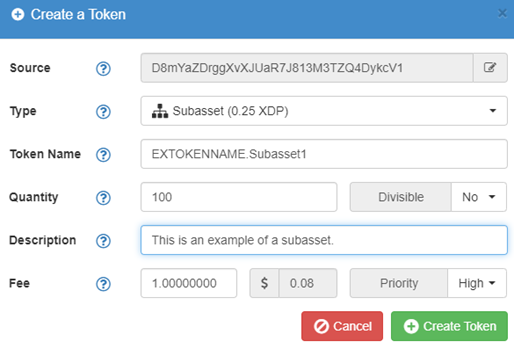
Subassets are a third category of token that can be created in Dogeparty, after Named and Numeric (as previously discussed). Much like a subdomain on an internet domain name, a Subasset is a token that has a second name attached to the parent token name, separated by a period. This is useful for those who want to create easily-identifiable collections or series. The naming conventions for Subassets are much less strict in that they can contain both lowercase letters and numbers. It costs 0.25 XDP to mint a subasset.
To create a Subasset, select “Create a Token” from the Actions menu and select “Subasset” as the type. For this example, we will be making a Subasset based on our example token, which would look like this:
Subassets can have different quantities than their parent asset and exist independently of the parent asset, associated with them only by the parent name. This means their ownership can be transferred independently and they can be destroyed without affecting the supply of the parent asset. Here is what a series of Subassets looks like as displayed in a wallet:
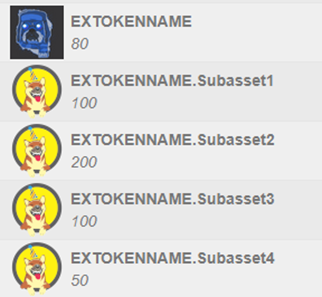
Like Named or Numeric tokens, Subassets can also be used to display images or other media by entering the URL pointing to it in the description field.
IX. How Do I Import the Private Key of an External DOGE Address?
Importing a private key can be used to display the balance of DOGE and/or Dogeparty tokens at its address in your Dogewallet. Since imported addresses are not stored by Dogewallet, you will need to transfer your balance to a Dogewallet address before logging out (if you want to keep them in a wallet address). To import a Dogecoin private key, click the Address Actions menu, and select “Change Address”. Then click “Options” and select “Import Private Key”.
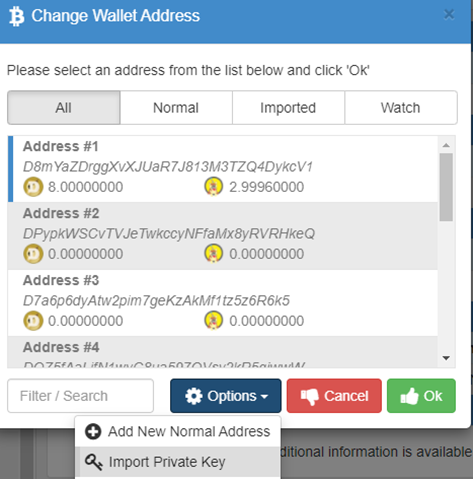
Next, paste your private key (long string that begins with “Q”) into the Import Private Key window, then press “OK” to proceed.

If the private key is valid, you will see a message that says “Address Dxxx… has been added to your wallet.” The imported address will appear at the bottom of your list of addresses as Imported Address #1. Double-click on it to access your balance(s). Remember that once you log out of Dogewallet, this information is no longer stored, and you will have to re-import the private key if you want to continue using this address through Dogewallet.
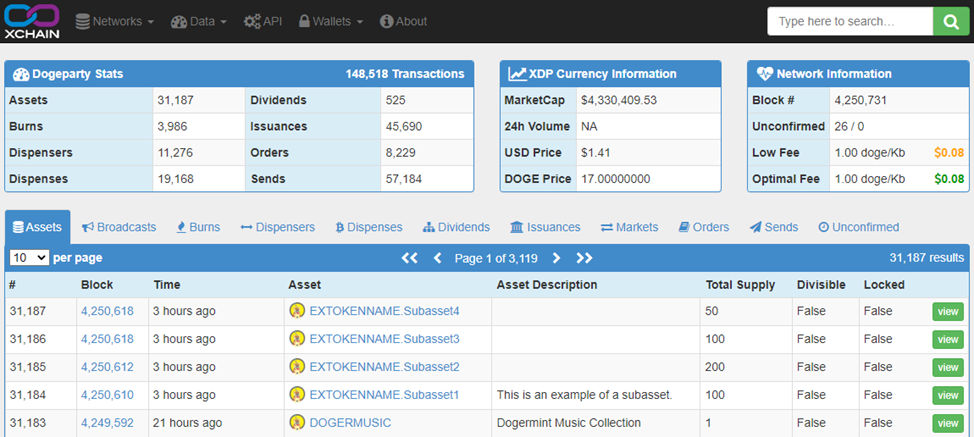
X. How Do I Use dogeparty.xchain.io?
In order to view Dogeparty transactions and tokens, you must use a Dogeparty-enabled Dogecoin block explorer. The default block explorer used by Dogeparty is dogeparty.xchain.io which is maintained by j-dog, the lead developer of both Counterparty and Dogeparty. This explorer contains not only valuable information pertaining to Dogeparty tokens and transaction statuses but a wealth of statistics about the state of Dogeparty. For example, displayed on the landing page are some basic statistics about Dogeparty, XDP, and the Dogecoin blockchain. Shown by default are the most recently created tokens:
Use the search function in the upper-right corner to find specific assets/tokens, transactions, and address balances. Clicking on the Data tab in the top menu area reveals lists of Dogeparty operations, sorted by most recent by default. Some of the more interesting of these are:
Dispensers. Displays a list of token dispensers in the order which they were opened.
Dispenses. Displays a list of recent token dispenses.
Issuances. Displays a list of recent token issuances, description changes, and supply changes.
Markets. Displays a list of markets in the order which they were added to the Exchange.
Sends. Displays a list of the most recent token sends direct from one address to another.
Other menu tabs store the following collections of Dogeparty data:
Networks. Use this to switch xchain to display data from Counterparty or Dogeparty Testnet.
API. Click this to display the full list of Dogeparty API commands. Can be used for the construction of custom applications/websites that support the Dogeparty protocol.
Wallets. Click this to find links to available Counterparty wallets (Dogeparty not currently displayed).
About. A summary of xchain and Dogeparty. Also contains links to related resources.
Asset Information Pages
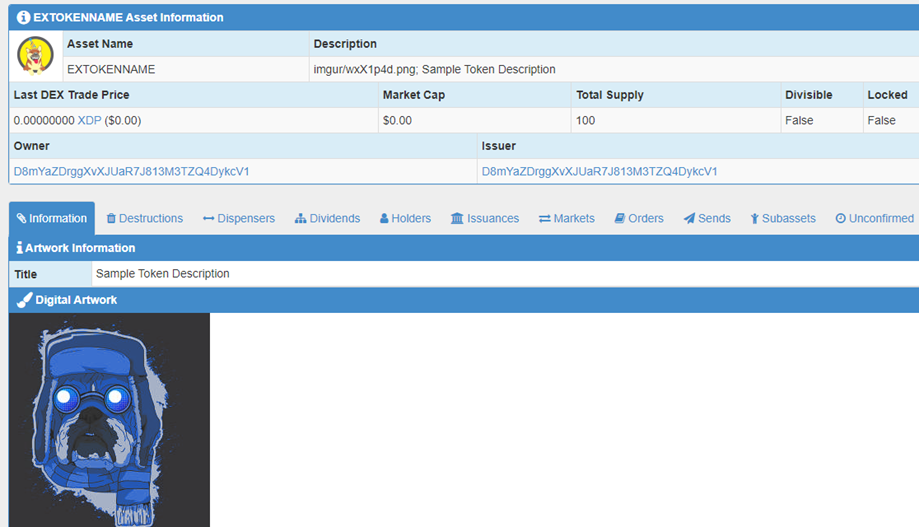
Clicking on an asset/token name in xchain will bring up all the important information about that token. This is what one such page looks like for our example token:
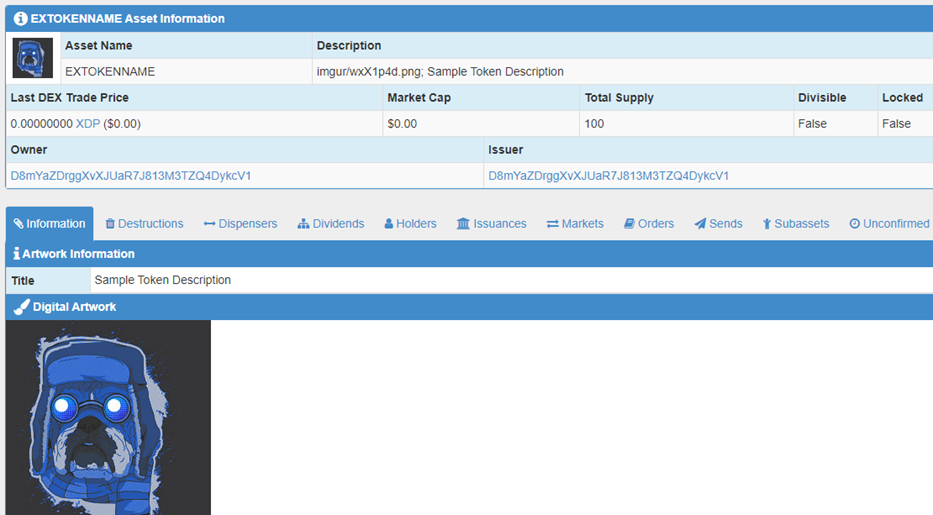
Here is an explanation of some of the non-obvious Asset Information fields:
Last DEX Trade Price. The price at which the last DEX trade occurred for this token in both XDP and USD.
Market Cap. The Total Supply multiplied by the Last DEX Trade Price.
Total Supply. The supply of all tokens currently in existence (increases with issuances, decreases with destructions).
Divisible. True = token is divisible by 8 decimal places; False = not divisible (only whole units can be transferred or destroyed).
Locked. True = supply has been locked; False = supply is unlocked (more tokens can be issued).
Owner. Address that currently possesses ownership of the token.
Issuer. Address of the token’s original creator.
Here is an explanation of the tabs beneath these fields:
Information. Displays the token Title, Digital Artwork, and other fields assigned if the Description is pointing to the URL of a file in the JSON format.
Destructions. List of holder-initiated destructions that have occurred for this token.
Dividends. List of dividend payments that have been made to holders of this token.
Holders. List of addresses holding this token, along with the quantities held by each address.
Issuances. List of Issuance operations that have taken place for this token, including its creation, description changes, supply issuances, changes to locking, and changes of ownership.
Markets. List of Exchange trading pairs for this token that have had buy and/or sell orders placed in them (may or may not still be active).
Orders. List of buy and/or sell orders that have been placed for this token (may or may not still be active).
Sends. List of direct transfers of this token from one address to another.
Subassets. List of subassets that have this token as its parent asset.
Unconfirmed. List of transactions involving this token that are currently waiting to be confirmed by the Dogecoin blockchain.
In addition to token pages, you can also use xchain to find pages for Dogeparty transactions and addresses, including by searching for them using the search utility. Transactions and addresses can also be referenced on a standard Dogecoin block explorer and are linked to the SoChain explorer in xchain. They can of course also be copied and pasted into other Dogecoin block explorers like Blockchair and Dogechain.
This concludes our complete guide on how to use Dogeparty! You can find more websites with information on how to use Dogeparty in our Resources page. You can also email us directly for support questions. For faster answers to pressing concerns, consider joining the official Dogeparty Chat group on Telegram.